
I created this picture a while back. A few years ago now. I wanted to learn more about texturing and the whole rendering process. This is actually based off the neo axis logo, from the neo axis engine. I was also trying out the new glow features which is you can see in the red and blue. It’s pretty dated now, but it still looks decent. I created this picture in Blender 3d, around 2.4 I think. Quite a while ago. This was turned into a tutorial a few years back, talking about modelling and the process I went. I don’t have it here any more but I’ll try to remember as much of the process as I can.
Process
This image is based off the Neo-axis logo (http://www.neoaxis.com/). It’s a bit different now, but the neoaxis logo were curved lines encircling each other like in this picture. Pretty much the structure you see here is the logo except extruded upwards.
Modelling it was fairly straight forward, all I did was created the crescent moon shape by using two cylinders then using the boolean function in Blender. The boolean function back then made it this triangulated mesh. Back then we didn’t have n-gons so it made things a lot more difficult. Blender now has a boolean modifier which would make things a little easier if I created this now.
For the metal roots, I used a curve with a circle extruded along it. It would then taper to nothing at the end. I think at this time it was the first time I extruded a circle along a curve so this part took a while to load.
The glowing lights was done with blenders new features at the time, the emit material. It was pretty exciting times, since the emit didn’t really emit light in the scene. The feature just got released for Blender Internal so I wanted to try out the different colours and to see how the lights would bounce about in there. It was an experimental feature though, so I don’t think it was added to Blender’s main program. In the end even for Blender today, I don’t think it’s in Blender Internal. If you wanted to do it, you would probably want to do it in Cycles.
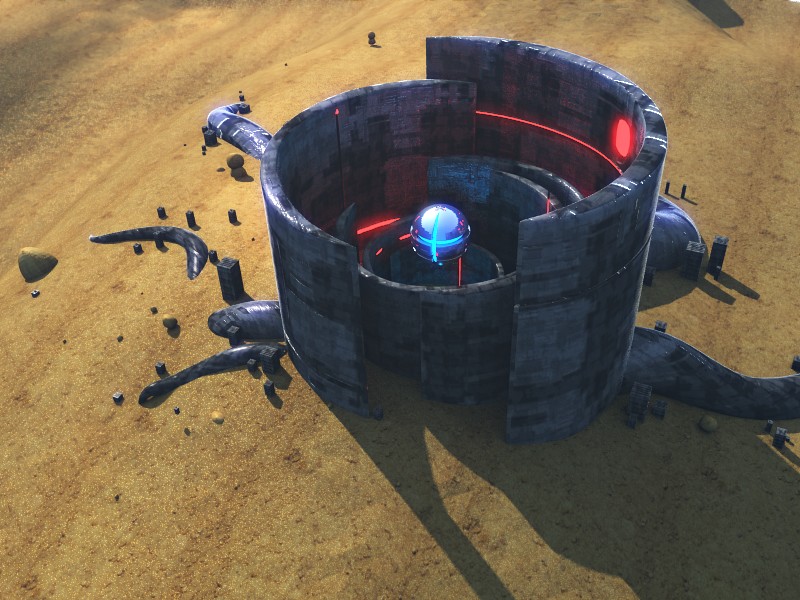
Adding the textures was a pain since, Blender’s textures didn’t really make sense to me back then. Even now, I don’t find adding textures in blender internal intuitive, but it still works and it’s easy enough to do once you get it.
I also wanted to give a sense of scale, I wanted it to be some kind of super structure, like kilometres in height and width. To do this I would attempt to do clouds. I don’t think blender internal had volumetrics back then so I tried to use transparent textures. But blender’s textures not being very intuitive I had a heck of a time adding this in. I managed to find a way to use textures in the end, but it looked pretty bad so I decided to drop it altogether.
Looking at it back now though it was a valuable experience, and I got a nice result from it and it was a good experiment. I think it only took me a couple of days to make this image, but I learned of the blender internal rendering pipeline.